Contents
- 1.-3. Pre-checks
- 4. Check for Laser pulses from last gas refill
- 5. Preparation for gas refill
- 6. Starting gas refill
- 7. Finishing the gas refill
- 8. Troubleshooting
-
Figures
- Figure 1 - System Settings
- Figure 2 - Monitor & Control
- Figure 3 - Refill Laser Procedure is Selected
- Figure 4 - Laser, Gas Refill Box
- Figure 5 - Gas refill system pipes are cleaned. Preparation for laser …
- Figure 6 - Old gas is pumped out from laser
- Figure 7 - Old gas is pumped out from laser
- Figure 8 - Cylinder is working. Laser chamber pressure is almost 0
- Figure 9 - Cylinder is opened
- Figure 10 - Laser chamber is filled with fresh gas from cylinder
- Figure 11 - Gas cylinder is closing
- Figure 12 - Pressure is stablilized before and after the gas cylinder …
- Figure 13 - Gas refill finished
- Figure 14 - Internal Storage, monitorlog.txt
- Figure 15 - Time From Last Gas refill in seconds and LaSeR Pulses From …
- Figure 16 - Clean Water Signal Example
- Footnotes
Gas Refill Instructions
1.-3. Pre-checks
- Open a browser an enter the IP address of the LIDAR you wish to monitor. You'll also need the username and password for accessing the LIDAR's web interface.
- Do not change any values which are not present in this manual. This can affect LIDAR work or damage the instrument.
- Please follow this instruction first without doing actual gas refill! Find specific menus, controls and boxes which are described in this manual and make familiar with them.
4. Check for Laser pulses from last gas refill
- From System Menu select Monitor & Control
- At the bottom of page select monitorlog.txt from Internal storage box (Fig. 14)
- You will see text with Time from last gas refill (TimeFLG) in seconds and pulses from last gas refill (LSRPulseFLG) (Fig. 15)
- Refill must be taken after 1E6 laser pulses, each month (2.6E6 seconds) or if laser energy drops below 1500uJ (can be read from Laser box in Monitor & Control)
- Counters will reset after each successful gas refill procedure (manual reset is possible using the RESET button near the Reset counters in Lidar work mode box in System Setting (Fig 1.)
5. Preparation for gas refill
- From System Menu select System Settings (Fig. 1)
- In Lidar work mode box (Fig 4) you will see 4 modes of operation (Standby, Continuous, Distance, Mixed) with additional gas refill procedures
- In Lidar work mode box select Standby, press Change. In pop-up box press OK (leave “Prevent this page from creating additional dialog” unchecked)
- From System Menu select Monitor & Control
- Check the status of Laser and Gas refill system (Fig. 2) or (Fig. 4). The normal Laser Pressure is from 600 to 700 kPa, Laser Temperature must be below 45(50)(1). Status messages: all are Ready and Cyl. Closed.
6. Starting gas refill
- From System Menu select System Settings
- In Lidar work mode box select Refill laser*, press Change. In pop-up box press OK (leave “Prevent this page from creating additional dialog” unchecked) (Fig. 3)
- From System Menu select Monitor & Control
Following gas refill
Now follow the information from Laser and Gas refill system boxes (Fig. 4) to (Fig. 13)
- Message: On start shows 30 seconds countdown timer
- Message: Vacuum. The Valves checkbox-es will start to toggle. Do not check Enable checkbox! Do not check manually any of valve checkbox-es (this includes Main, Fill, Air, Vac, Hel, Purge, Cyl). This can permanently damage the laser!
- Message: Prepump. Old gas is sucked out of laser. You can follow for laser gas pressure in Laser box
- Message: Pump. When the laser pressure decreases below 120kPa gas refill system will continue to pump uninterrupted the remaining gas out for another 180 seconds.
- Message: Cyl. working. Gas cylinder motor will start to open the internal gas cylinder valve.
- Message: Cyl. open or Fill. When cylinder in completely open, the Cylinder pressure (in Gas refill box) will indicate high pressure before the pressure regulator (above 10000kPa).
- Message: Fill. Will indicate that gas refill system started to fill laser with fresh gas from cylinder. The laser pressure will increase
- Message: Cyl. Close. The cylinder valve starts closing when laser pressure reaches 600kPa
- Message: Reductor. The gas refill system will stabilize pressure in pressure regulator and laser
- Message: Stopped. The gas refill is finished successfully. The pressure values in laser and cylinder will be around 650kPa and 500kPa.
7. Finishing the gas refill
- Check the pressure values of Laser and Cylinder(2) Normal rages are around 650kPa and 500kPa.
- From System Menu select System Settings
- In Lidar work mode box select Mixed, press Change. In pop-up box press OK (leave “Prevent this page from creating additional dialog” unchecked)
- The lidar will begin to operate
- From System Menu select Data view
- Wait for 5 to 10 seconds for the plot with signal to update. An example of water spectrum with Raman scattering line is shown in (Fig. 16).
8. Troubleshooting
In any case of emergency STOP lidar operation and contact with our service team using is[at]ldi-innovation[dot]eu email. Try to provide as many information as possible with screenshots of web user interface.
Figures
Figure 1 - System Settings

Figure 2 - Monitor & Control
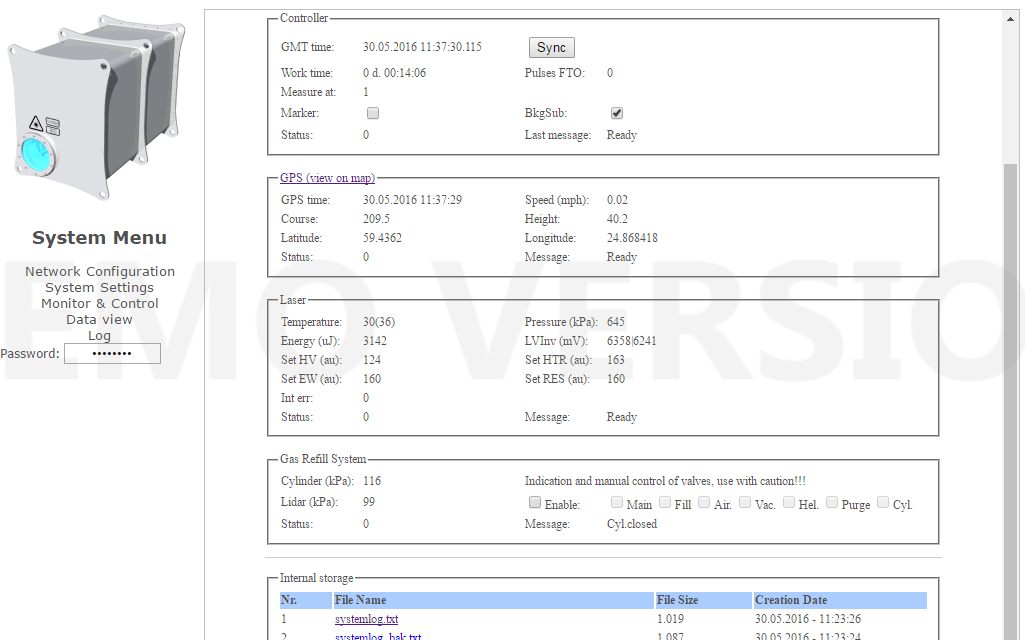
Figure 3 - Refill Laser Procedure is Selected

Figure 4 - Laser, Gas Refill Box
Laser box:
- Temperature - the first number shows lidar internal ambient air temperature and the number in brackets () shows the temperature of electronics,
- Energy (uJ) – laser pulse energy, Pressure (kPa) – laser gas pressure.
Gas Refill System box:
- Cylinder (kPa) – internal fresh gas cylinder pressure before the pressure regulator
- Lidar (kPa) – internal ambient pressure of lidar hull
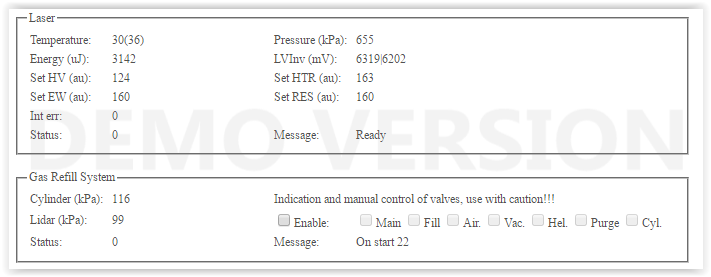
Figure 5 - Gas refill system pipes are cleaned. Preparation for laser chamber pumping

Figure 6 - Old gas is pumped out from laser

Figure 7 - Old gas is pumped out from laser
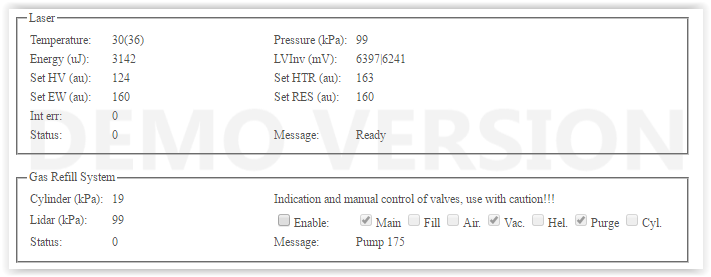
Figure 8 - Cylinder is working. Laser chamber pressure is almost 0

Figure 9 - Cylinder is opened

Figure 10 - Laser chamber is filled with fresh gas from cylinder
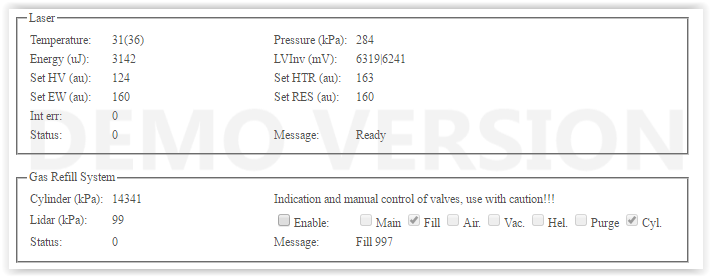
Figure 11 - Gas cylinder is closing
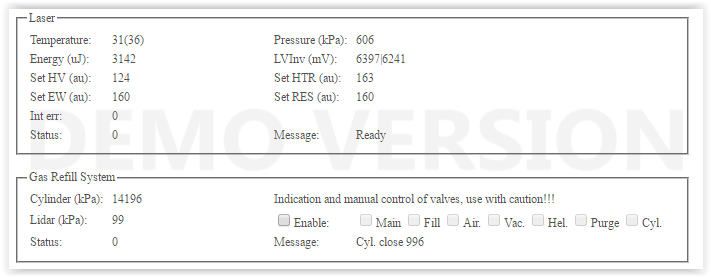
Figure 12 - Pressure is stablilized before and after the gas cylinder pressure regulator

Figure 13 - Gas refill finished

Figure 14 - Internal Storage, monitorlog.txt

Figure 15 - Time From Last Gas refill in seconds and LaSeR Pulses From Last Gas refill

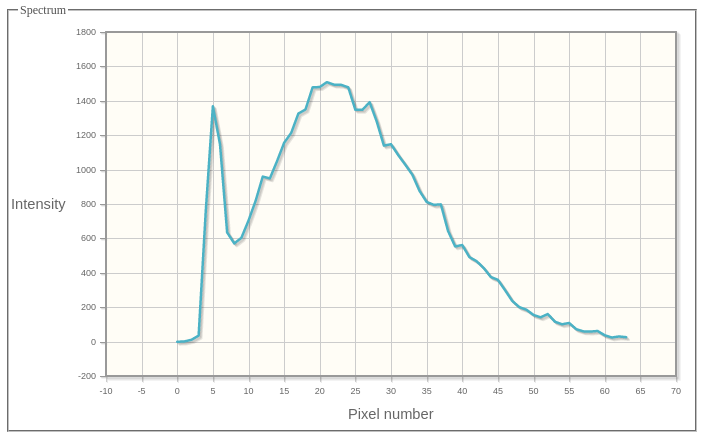
Figure 16 - Clean Water Signal Example
Peak on the left is Raman scattering signal. Broad shape on the right is Dissolved Organic Matter (DOM) fluorescence.
Footnotes
1
45(50) – The first number shows LIDAR internal ambient air temperature and the number in brackets () shows the temperature of electronics. Values are in degrees Celsius. Both numbers must be below 50. The laser will automatically shutdown when internal ambient air temperature rises above 45 degrees Celsius!
2
The LIDAR pressure in gas refill system box shows the ambient pressure inside the LIDAR hull. This value is not critical.
Attachments (16)
- 01-gas-refill-system-settings.png (87.3 KB) - added by oliver 10 years ago.
- 02-gas-refill-monitor-control.png (122.3 KB) - added by oliver 10 years ago.
- 03-gas-refill-laser-procedure.png (87.2 KB) - added by oliver 10 years ago.
- 04-gas-refill-temp-pressure.png (38.6 KB) - added by oliver 10 years ago.
- 05-gas-refill-pipes-cleaned.png (38.7 KB) - added by oliver 10 years ago.
- 06-gas-refill-old-gas-removal.png (39.0 KB) - added by oliver 10 years ago.
- 07-gas-refill-old-gas-removal.png (38.7 KB) - added by oliver 10 years ago.
- 08-gas-refill-cylinder-working.png (38.8 KB) - added by oliver 10 years ago.
- 09-gas-refill-cylinder-open.png (39.1 KB) - added by oliver 10 years ago.
- 10-gas-refill-fresh-gas.png (38.5 KB) - added by oliver 10 years ago.
- 11-gas-refill-cylinder-close.png (38.9 KB) - added by oliver 10 years ago.
- 12-gas-refill-pressure-stable.png (38.8 KB) - added by oliver 10 years ago.
- 13-gas-refill-finished.png (38.5 KB) - added by oliver 10 years ago.
- 14-gas-refill-internal-storage.png (18.9 KB) - added by oliver 10 years ago.
- 15-gas-refill-last-refill.png (5.2 KB) - added by oliver 10 years ago.
- 16-gas-refill-clean-water-signal.png (31.1 KB) - added by oliver 10 years ago.
Download all attachments as: .zip